Table of Contents
Armored Cable Gland Installation
Are you one of those people who want to know the steps on how to install an armored cable gland? Are you struggling to find the right resources for your problem?
Fret not, because you’ve come to the perfect place! Allow this post to help you with your concerns. But first, keep in mind that armored cable glands run a set of vital roles, especially in cable management.
How to Install Armored Cable Gland
In fact, Did you know that they are created to attach and secure the end of an electric cable and the device it is connected to? Cable gland offer:
- earthing
- grounding
- insulation
- bonding and;
- strain relief
They could also be utilized to cover cables that pass through gland plates and bulkheads. They will often find them in a harsh or hazardous setting where they must have electrical sparks of flames or repeat outside contaminants like:
- fluis
- dirt and;
- dust
On top of that: Their role is to prevent cables from being twisted or pulled to guarantee a safe connection and continuous performance.
That’s all about armored cable glands.
Take note that you’re here to learn more about the proper installation of armored cable glands. Now, are you ready? Without further a do, let’s get started.
Proper Step on Installing Armored Cable Glands
Step 1: Determine the type of steel in the cable
Check the number of cores available on the cable.
Make sure you also determine their exact size.
Step 2: Check the gland pack
Before you start installing your armored cable gland, make sure you carefully check your gland pack.
Doing so will confirm that what you have is the proper gland for the cable you have chosen.
On the back of the gland pack, you will see a grid matrix.
That grid matrix presents the size of the conductors.
There, you will have different sizes, such as 1.5, 2.5, 5, 6, 10, and so much more. It also goes across and looks at the number of conductors within the actual SWA cable. You need to match that gland to the actual cable you are using.
The gland pack will be composed of:
- two shrouds
- two locking nuts
- two gland nuts
- two gland bodies
- two earthing rings
That will offer you enough to terminate both ends.
Step 3. Measure the length you need
Before you start the termination process, it would help if you measure the length of the cable you need.
Grab a tape and put a mark on it so you’ll have an idea of the area to cut.
Step 4. Fit the shroud
Here’s where the real thing begins.
Grab your shroud and insert it onto the end of the SWA cable. Pull it nice and firmly.
Cut around the top, but make sure the shroud has still a good fit to the SWA cable.
After cutting, slide it down into the cable.
Step 5: Cut the cable
Grab a junior hacksaw and cut the cable around the top of the tape you put earlier.
Just follow the tape line that is there as best as you could.
Just make sure you don’t go through, as you can damage the conductors inside.
Step 6: Remove the PVC
After you got around the cable, pull the outside of the PVC with your knife.
Hold the armored cable firmly and run your knife out along the cable length. Then remove it all.
Step 7: Unwind the wire off the cable
Gently rock the wire backward forward after you unwind the cord off the cable.
You need to break it away from the base. If it doesn’t come off, you can always use your junior hacksaw.
Step 8: Put on the gland nut
Get your gland nut and make sure the threads in the gland are pointing upwards.
Determine how much of the PVC you are going to remove to expose the SWA.
You need to ensure you do not take too much of the PVC off.
To do that, take a knife and cut a centimeter 10 below the taped section. Just run it around with a knife.
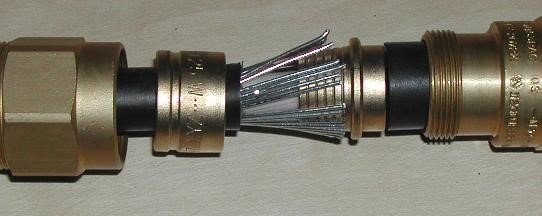
Step 9. Insert the gland with the serrated edge down
Make sure the thimble part of the gland will drop inside and does not go beyond the thread.
Wind the gland body and gland nuts open.
You can then drop the gland underneath the SWA.
Remember that it must be a firm rotation.
Make sure the SWA is in the section which of the thimble or the serrated part of the gland.
Pull it out from fully inside it.
Let the nut to come up to meet the threads. You need to make sure they do not cross-thread.
Push the gland downward, so it’s in the armoring.
Wind it up with your fingers.

Step 10. Tighten it off
The best way to tighten it is by using a spanner.
Get two spanners. The first spanner should be on the actual nut while the other one will be on the gland body.
Try to bring it back up. Twist the gland nut to tighten it into the gland body.
It’s recommended to use spanners rather than adjustable grips, as the latter shaves off the brass parts of the gland body.
Step 11: Remove the outside PVC on the other side of the cable
About ten to fifteen millimetres away from the body, the body itself will be attached to the earth.
Therefore, you do not want the conductors to rub against the actual body.
Take your knife and cut gently round.
Give it a little twist and remove it slowly.
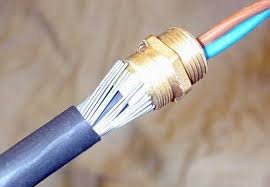
You will then expose the three conductors.
Step 11: Add the earthing ring to the enclosure
The next thing you need to do is to add the earthing ring into your enclosure, followed by the nut on the inside. For the last step, make sure you check that none of the steel wire armors have crossed over. To do that, simply rotate all the way around and make sure none of them have missed underneath the gland body.
Now the gland is on and the gland is tight.
Conclusion
There you have it! This is your step-by-step guide on how to install armored cable gland. We hope you learned everything you know in this post.
Now, are you ready to install armored cable gland by yourself? Just follow the steps we presented in this post, and you’re good to go!
Feel free to share your thoughts with us by leaving your comments below! We wish you the best of luck!
Author: Quan Guan Electric China. They are producing cable glands from last 15 years. To buy a good quality of cable glands, Quan Guan Electric is the best choice.


Thanks for this post.
I looked for stepwise method for longwhile…. finally got it from your post..thank you